Friday, December 10, 2010
Thursday, December 9, 2010
Free Christmas Cat Pillow Sewing Pattern
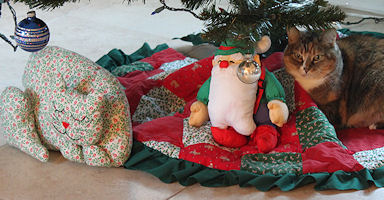
Materials Needed
¾ yard of 45" width fabric (such as cotton calico, corduroy, satin, velvet etc.) for cat
ribbon (not shown, but you can attach a ribbon with bow around "neck")
embroidery floss OR fabric paint for cat's face
fabric glue (if using glue to attach pieces to body)
quilting pins
thread to match fabric
sewing ruler
Directions
1. Print your patternScroll down for pattern.
2. Fold fabric across the width. Follow pattern lay-out directions below.
Cut out fabric pieces.
Layout is not drawn to scale, but pieces do fit as shown.

3. Embroider or paint face onto right side of one cat head piece.
4. Sew together head pieces, right side together, leaving a small area open for stuffing. Do the same with hind leg and two front paws.
5. Sew together tail, right sides together, leaving open the end that attaches to the body.
6. Sew together the body, right sides together, leaving open a small area on the bottom for stuffing, as well as the area where the tail will be inserted.
7. Turn all sewn pieces right side out. Stuff all pieces.
8. Hand stitch pieces closed. Leave the area open where tail fits into body.
9. Insert tail into the body opening and hand stitch into place.
10. Hand stitch or glue cat's head into place.
11. Hand stitch or glue hind leg and front paws into place.
12. Tie ribbon bow around neck.
click here for more kitty cat crafts

Wednesday, December 8, 2010
Tuesday, December 7, 2010
Ho ho ho! Put your cat(or dog) up on a Christmas tree~

STEPS:
- Paint the lid with red or green acrylic paint. Let dry, then add a second coat.
- Paste the photo inside using a glue stick or collage medium.
- Paste a gift tag or wrapping to the backside of the lid. If using wrapping or other decorative paper, pull over the side of the rim and glue down. (This will be covered by ribbon later.)
- When dry, add a Santa hat or elf hat to the image using scraps of red or green and white paper. (Not necessary if your cat is wearing festive Christmas wear in the photo.) Or, paint on a hat, and outline hat in permanent black ink.
- If desired, add beading, cord, or other embellishment to the inside rim. (These are mini-collages – use your imagination!) Line the inner rim with glue glitter.
- Using 20-guage copper wire, cut a length that is as long as the circumference of the ornament, plus an additional couple of inches.
- At the halfway point in the wire, create a loop by twisting the wire a couple of times.wrap the non-loop part of the wire around the ornament — a strand of wire on each side. Tightly twist the wire wear it meets at the bottom. Loop it around several times to hold. Cut off one the strands and wrap around the remaining piece of wire – a couple of twists is fine.
- Thread glass beads onto the remaining strand at the bottom of the ornament. When finished beading, fold and twist the wire up and around the last bead.
- Glue ribbon around the outer rim.
- Dab anti-fray agent or clear nail polish on cut end of ribbon to prevent fraying.
- Coat the image with water-based varnish/medium or resin*, let dry completely.
- Coat the back side with water-based varnish/medium or resin, let dry completely.
- Coat the rim ribbon with water-based varnish/medium, let dry completely.
* Resin requires 24 hours to dry, and an additional week or so to cure, so plan ahead if you use resin.
This is a great gift for cat-loving friends or co-workers. It’s also a great project for a DIY ornament party. It’s easy enough for kids (8 yrs +) to do with adult supervision.
Click here for a complete materials list and additional instructions.
[SOURCE: CatCrafter.com]

Subscribe to:
Posts (Atom)