Showing posts with label holiday. Show all posts
Showing posts with label holiday. Show all posts
Friday, March 18, 2011
Friday, March 4, 2011
Cat St. Patrick's Day Ecards
Below you will find our selection of cat St. Patrick's Day ecards. When you find the cat St. Patrick's Day ecard you would like to customize just click "Select". Next choose from over 25 cats to star in your St. Patrick's Day ecard, including a: Tuxedo cat, Black cat, Bengal, Maine Coon, Tabby, Chartreux, Himalayan, Persian, Siamese, Sphynx, White cat, Ragdoll, and more!
http://www.sloppykisscards.com/cat-st-patricks-day-ecards.php
http://www.sloppykisscards.com/cat-st-patricks-day-ecards.php

Monday, February 14, 2011
Five Valentine's Day Rules for Pet Owners.

- Your little one shouldn’t eat any candy on this chocolate filled holiday.
- Watch out for those flowers.
- Don’t let your romantic dinner turn into your pet’s first fire.
- >> Read more
Saturday, December 25, 2010
Thursday, December 23, 2010
Tuesday, December 21, 2010
Friday, December 17, 2010
How to Make a Cat Scratching Post

1. Decide on the measurements of the post before beginning. The post must be stable, for if it tips easily, Kitty may find it to be unsuitable for continued use. The model in the picture measures 28" tall, and the base is about 18" by 12". The post needs to be, at minimum, the length of Kitty plus a couple of inches for her stretch.
2. Use a 4x4 post or 2-2x4 pieces attached together, and cut to the length needed. Set this aside for a moment.
3. The base on this model has two layers. The first layer is made by setting 3-12" sections of 2x6 side by side. Cut 2 sections of 2x6 to match the width of the first layer (16.5" as 2x6 are in truth 1.5" by 5.5"). Place these 2 sections of the second layer on top of and parallel to the first layer. Attach the top layer to the bottom with wood screws. This makes for a heavy and stable base.
4. Cover the base with your scratch material, something along the lines of Berber carpet or AstroTurf. Natural rope, like sisal, is nice, but takes a while to wrap tightly. A manual staple gun is perfect for this project, but roofing nails and flat tacks are also good choices.
5. Place the post in the center of the base. Attach the post to the base by using one screw on each face of the post.
6. Cover the post with your scratch material, and attach as described for the base.
7. Attach a favorite toy, or something dangly and irresistable, to the top to entice Kitty to get to know the new post.
8. Now, if you want a double-fun, and double-duty scratching post, attach some old brush heads or something similar about Cat's Eye level on the post. These are perfect for some awesome Feline Facials!
click here to see video
Thursday, December 9, 2010
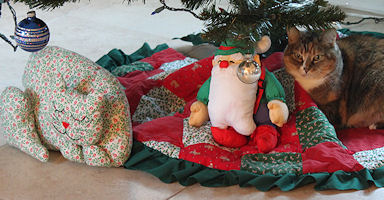
Free Christmas Cat Pillow Sewing Pattern
Materials Needed
¾ yard of 45" width fabric (such as cotton calico, corduroy, satin, velvet etc.) for cat
ribbon (not shown, but you can attach a ribbon with bow around "neck")
embroidery floss OR fabric paint for cat's face
fabric glue (if using glue to attach pieces to body)
quilting pins
thread to match fabric
sewing ruler
Directions
1. Print your patternScroll down for pattern.
2. Fold fabric across the width. Follow pattern lay-out directions below.
Cut out fabric pieces.
Layout is not drawn to scale, but pieces do fit as shown.

3. Embroider or paint face onto right side of one cat head piece.
4. Sew together head pieces, right side together, leaving a small area open for stuffing. Do the same with hind leg and two front paws.
5. Sew together tail, right sides together, leaving open the end that attaches to the body.
6. Sew together the body, right sides together, leaving open a small area on the bottom for stuffing, as well as the area where the tail will be inserted.
7. Turn all sewn pieces right side out. Stuff all pieces.
8. Hand stitch pieces closed. Leave the area open where tail fits into body.
9. Insert tail into the body opening and hand stitch into place.
10. Hand stitch or glue cat's head into place.
11. Hand stitch or glue hind leg and front paws into place.
12. Tie ribbon bow around neck.
click here for more kitty cat crafts
Tuesday, December 7, 2010
Ho ho ho! Put your cat(or dog) up on a Christmas tree~

STEPS:
- Paint the lid with red or green acrylic paint. Let dry, then add a second coat.
- Paste the photo inside using a glue stick or collage medium.
- Paste a gift tag or wrapping to the backside of the lid. If using wrapping or other decorative paper, pull over the side of the rim and glue down. (This will be covered by ribbon later.)
- When dry, add a Santa hat or elf hat to the image using scraps of red or green and white paper. (Not necessary if your cat is wearing festive Christmas wear in the photo.) Or, paint on a hat, and outline hat in permanent black ink.
- If desired, add beading, cord, or other embellishment to the inside rim. (These are mini-collages – use your imagination!) Line the inner rim with glue glitter.
- Using 20-guage copper wire, cut a length that is as long as the circumference of the ornament, plus an additional couple of inches.
- At the halfway point in the wire, create a loop by twisting the wire a couple of times.wrap the non-loop part of the wire around the ornament — a strand of wire on each side. Tightly twist the wire wear it meets at the bottom. Loop it around several times to hold. Cut off one the strands and wrap around the remaining piece of wire – a couple of twists is fine.
- Thread glass beads onto the remaining strand at the bottom of the ornament. When finished beading, fold and twist the wire up and around the last bead.
- Glue ribbon around the outer rim.
- Dab anti-fray agent or clear nail polish on cut end of ribbon to prevent fraying.
- Coat the image with water-based varnish/medium or resin*, let dry completely.
- Coat the back side with water-based varnish/medium or resin, let dry completely.
- Coat the rim ribbon with water-based varnish/medium, let dry completely.
* Resin requires 24 hours to dry, and an additional week or so to cure, so plan ahead if you use resin.
This is a great gift for cat-loving friends or co-workers. It’s also a great project for a DIY ornament party. It’s easy enough for kids (8 yrs +) to do with adult supervision.
Click here for a complete materials list and additional instructions.
[SOURCE: CatCrafter.com]

Monday, December 6, 2010

Monday, November 22, 2010
How to Protect Your Pets on Thanksgiving Day
Thanksgiving is an exciting time for many people and pets,
especially dogs and cats but it can be also stressful for them
as their environment suddenly changes.
All at once, there are delicious and welcoming smells floating
through the air, tempting treats and new foods in close proximity,
the shuffle of many feet around the house, family and friends
and possibly strangers chatting, laughing, and both cooing over,
and ignoring the furry family members.
It is easy for pets to get lost in the shuffle while the merriment is
occurring however, it is important to pay attention
so that they do not fall victim to potential edible ills, injury
or an over burden of excitement.
Here are some ways to ensure they remain comfortable, happy and safe.
Instructions
1. If you plan to have a lot of guests arriving during a short time frame, place the pet in one of the out of way rooms and close the door. Place the pet bed inside with a favorite toy and if you have a radio or TV, turn it on low. Familiar items and a low hum of music should help the pet be more comfortable and not as excitable even though the noises of people arriving will likely be heard. After everyone has arrived and settled in, allow the pet out to roam and greet people. If you have a caged bird, placing a cover over the cage should help the bird remain calm. A cat may prefer to stay in a quiet spot, out of the way; do not force the cat to greet visitors as it may scratch or bite if it feels threatened.
Click here to read more
especially dogs and cats but it can be also stressful for them
as their environment suddenly changes.
All at once, there are delicious and welcoming smells floating
through the air, tempting treats and new foods in close proximity,
the shuffle of many feet around the house, family and friends
and possibly strangers chatting, laughing, and both cooing over,
and ignoring the furry family members.
It is easy for pets to get lost in the shuffle while the merriment is
occurring however, it is important to pay attention
so that they do not fall victim to potential edible ills, injury
or an over burden of excitement.
Here are some ways to ensure they remain comfortable, happy and safe.
Instructions
1. If you plan to have a lot of guests arriving during a short time frame, place the pet in one of the out of way rooms and close the door. Place the pet bed inside with a favorite toy and if you have a radio or TV, turn it on low. Familiar items and a low hum of music should help the pet be more comfortable and not as excitable even though the noises of people arriving will likely be heard. After everyone has arrived and settled in, allow the pet out to roam and greet people. If you have a caged bird, placing a cover over the cage should help the bird remain calm. A cat may prefer to stay in a quiet spot, out of the way; do not force the cat to greet visitors as it may scratch or bite if it feels threatened.
Click here to read more
Subscribe to:
Posts (Atom)