Friday, December 31, 2010

Wednesday, December 29, 2010
Tuesday, December 28, 2010
Why, oh why do cats chase rats around?

The Chinese zodiac - Zodiac signs of the Chinese
The Chinese zodiac has twelve signs. Originally, these signs did not have animals associated with them but were signs used to record dates. They were called the 12 Earthly Branches and 10 Celestial Stems and their use went back to the Shang dynasty. Later, each of the 12 earthly branches came to be designated by an animal sign: rat, ox, tiger, rabbit, dragon, snake, horse, sheep, monkey, rooster, dog, and boar.
There is a folk story that describes how the animals were assigned to the cycle of years. A long long time ago, the Lord Buddha summoned all the animals together to assign each of them a year. When the cat heard the news, he let his friend the rat know about it and the two animals decided to go together the next day. However, the next day the rat did not wake the cat who, being a cat and loving to nap, slept through the morning. Therefore, the cat did not make it to the assembly on time and did not get a year. This is why there is no year of the cat and this is why cats hate rats.
The rat, on the other hand, made it first there and received the first year. He did not achieve this without trickery either. He knew that a small animal like him would not be able to compete with the others, so he begged the ox to let him ride on its head. The ox consented and they went together. Just when they were about to arrive, the rat jumped off the ox's head and got through the finish line first. This is why the year of the rat is the first year in the cycle and the year of the ox is the second.
http://ow.ly/3sIl7
Monday, December 27, 2010
Which colors do cats see?
In scientific tests, cats have responded to the colors in the purple, blue, green and yellow range. Red, orange and brown colors appear to fall outside the cats color range and are most likely seen by them as dark to mid shades of gray.
Cats appear to see less saturation in colors than humans, meaning cats do not see colors as intensely or vibrantly. Purple, blue & green appear to be the strongest colors perceived by cats.
http://ow.ly/3tuEB
Cats appear to see less saturation in colors than humans, meaning cats do not see colors as intensely or vibrantly. Purple, blue & green appear to be the strongest colors perceived by cats.
http://ow.ly/3tuEB
Sunday, December 26, 2010
Saturday, December 25, 2010
Friday, December 24, 2010
Thursday, December 23, 2010
Wednesday, December 22, 2010
Tuesday, December 21, 2010
Why cats and dogs don't get along?
Why cats and dogs don't get along? This wonderful Korean Folktale answers the question.
http://www.amazon.com/Magic-Gem-Korean-Folktale-about/dp/080483654X
Monday, December 20, 2010
Sunday, December 19, 2010
Chin Yu Min and the Ginger Cat

Chin Yu Min, a haughty and frivolous rich woman in a fictitious Old China, must mend her ways when her husband dies and her money runs out. She meets a ginger cat who fishes so well with his tail that she recoups some of her fortunes from selling his catches. When he disappears, Chin Yu Min is so distraught that she humbles herself enough to ask her neighbors for help.
Illustrated by Mary Grandpre
http://www.amazon.com/Chin-Yu-Min-Ginger-Cat/dp/0517885492/ref=sr_1_1?ie=UTF8&qid=1302445552&sr=8-1
Saturday, December 18, 2010
Friday, December 17, 2010
How to Make a Cat Scratching Post

1. Decide on the measurements of the post before beginning. The post must be stable, for if it tips easily, Kitty may find it to be unsuitable for continued use. The model in the picture measures 28" tall, and the base is about 18" by 12". The post needs to be, at minimum, the length of Kitty plus a couple of inches for her stretch.
2. Use a 4x4 post or 2-2x4 pieces attached together, and cut to the length needed. Set this aside for a moment.
3. The base on this model has two layers. The first layer is made by setting 3-12" sections of 2x6 side by side. Cut 2 sections of 2x6 to match the width of the first layer (16.5" as 2x6 are in truth 1.5" by 5.5"). Place these 2 sections of the second layer on top of and parallel to the first layer. Attach the top layer to the bottom with wood screws. This makes for a heavy and stable base.
4. Cover the base with your scratch material, something along the lines of Berber carpet or AstroTurf. Natural rope, like sisal, is nice, but takes a while to wrap tightly. A manual staple gun is perfect for this project, but roofing nails and flat tacks are also good choices.
5. Place the post in the center of the base. Attach the post to the base by using one screw on each face of the post.
6. Cover the post with your scratch material, and attach as described for the base.
7. Attach a favorite toy, or something dangly and irresistable, to the top to entice Kitty to get to know the new post.
8. Now, if you want a double-fun, and double-duty scratching post, attach some old brush heads or something similar about Cat's Eye level on the post. These are perfect for some awesome Feline Facials!
click here to see video
Thursday, December 16, 2010
Wednesday, December 15, 2010
Tuesday, December 14, 2010
Cat Quote of the day by Mark Twain
I simply can't resist a cat, particularly a purring one.
They are the cleanest, cunningest, and most intelligent things I know,
outside of the girl you love, of course.
-Mark Twain
They are the cleanest, cunningest, and most intelligent things I know,
outside of the girl you love, of course.
-Mark Twain
Monday, December 13, 2010
Sunday, December 12, 2010


Saturday, December 11, 2010
Friday, December 10, 2010
Thursday, December 9, 2010
Free Christmas Cat Pillow Sewing Pattern
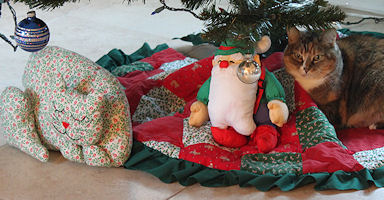
Materials Needed
¾ yard of 45" width fabric (such as cotton calico, corduroy, satin, velvet etc.) for cat
ribbon (not shown, but you can attach a ribbon with bow around "neck")
embroidery floss OR fabric paint for cat's face
fabric glue (if using glue to attach pieces to body)
quilting pins
thread to match fabric
sewing ruler
Directions
1. Print your patternScroll down for pattern.
2. Fold fabric across the width. Follow pattern lay-out directions below.
Cut out fabric pieces.
Layout is not drawn to scale, but pieces do fit as shown.
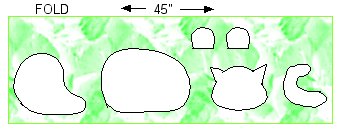
3. Embroider or paint face onto right side of one cat head piece.
4. Sew together head pieces, right side together, leaving a small area open for stuffing. Do the same with hind leg and two front paws.
5. Sew together tail, right sides together, leaving open the end that attaches to the body.
6. Sew together the body, right sides together, leaving open a small area on the bottom for stuffing, as well as the area where the tail will be inserted.
7. Turn all sewn pieces right side out. Stuff all pieces.
8. Hand stitch pieces closed. Leave the area open where tail fits into body.
9. Insert tail into the body opening and hand stitch into place.
10. Hand stitch or glue cat's head into place.
11. Hand stitch or glue hind leg and front paws into place.
12. Tie ribbon bow around neck.
click here for more kitty cat crafts
Wednesday, December 8, 2010
Tuesday, December 7, 2010
Ho ho ho! Put your cat(or dog) up on a Christmas tree~

STEPS:
- Paint the lid with red or green acrylic paint. Let dry, then add a second coat.
- Paste the photo inside using a glue stick or collage medium.
- Paste a gift tag or wrapping to the backside of the lid. If using wrapping or other decorative paper, pull over the side of the rim and glue down. (This will be covered by ribbon later.)
- When dry, add a Santa hat or elf hat to the image using scraps of red or green and white paper. (Not necessary if your cat is wearing festive Christmas wear in the photo.) Or, paint on a hat, and outline hat in permanent black ink.
- If desired, add beading, cord, or other embellishment to the inside rim. (These are mini-collages – use your imagination!) Line the inner rim with glue glitter.
- Using 20-guage copper wire, cut a length that is as long as the circumference of the ornament, plus an additional couple of inches.
- At the halfway point in the wire, create a loop by twisting the wire a couple of times.wrap the non-loop part of the wire around the ornament — a strand of wire on each side. Tightly twist the wire wear it meets at the bottom. Loop it around several times to hold. Cut off one the strands and wrap around the remaining piece of wire – a couple of twists is fine.
- Thread glass beads onto the remaining strand at the bottom of the ornament. When finished beading, fold and twist the wire up and around the last bead.
- Glue ribbon around the outer rim.
- Dab anti-fray agent or clear nail polish on cut end of ribbon to prevent fraying.
- Coat the image with water-based varnish/medium or resin*, let dry completely.
- Coat the back side with water-based varnish/medium or resin, let dry completely.
- Coat the rim ribbon with water-based varnish/medium, let dry completely.
* Resin requires 24 hours to dry, and an additional week or so to cure, so plan ahead if you use resin.
This is a great gift for cat-loving friends or co-workers. It’s also a great project for a DIY ornament party. It’s easy enough for kids (8 yrs +) to do with adult supervision.
Click here for a complete materials list and additional instructions.
[SOURCE: CatCrafter.com]

Monday, December 6, 2010

Sunday, December 5, 2010
Saturday, December 4, 2010
Alley Cat Allies - Winter Tips
Winter Weather Tips
Stray and feral cats are at home outside, but they can always use some extra help in cold or severe weather. Follow these tips to help them stay even safer, warmer, and healthier during severe storms and winter months.
Shelter
Shelters keep feral cat colonies comfortable in cold and other harsh or severe weather conditions. Placing discreet shelters in quiet locations away from foot traffic helps keep cats from taking shelter in places where they are in danger or not welcome.
There are endless variations of cat shelters. Check out our list of shelter ideas sorted by ease of set up, or learn how to build one yourself. Dog houses also do the trick with a few modifications (read on.) Here’s a few tips to help you get started:
A good size for a shelter is at least 2’x3’ and at least 18” high. Larger shelters are not necessarily better, since heat disperses quickly, leaving the inside as cold as the outside.
Cats will huddle together inside for warmth, so provide colonies with multiple shelters that can fit three to five cats each. If you are caring for fewer cats, use a smaller shelter so it takes less body heat to warm up.
Make sure the door is no bigger than six to eight inches wide to keep out other animals. If you’re modifying a dog house, you’ll need to block off part of the door to make it cat-sized. A flap on the door will also keep snow, rain, and wind out.
Insulate the shelter with straw to repel moisture and keep cats warm and dry (note: Make sure it’s straw, but not hay, because hay absorbs moisture). Blankets may seem like a good idea, but since they are also extremely absorbent, they make bad bedding.
Raise shelters off the cold ground to conserve warmth. Wooden pallets stuffed with insulation work well for elevating shelters and keeping out drafts.
That’s a start – read more about constructing feral cat shelters in our Colony Care Guide.
Click here to read more
Friday, December 3, 2010
How to Take Care of an Outdoor Cat in Winter
By Dave Donovan, eHow Contributor
Cats are one of the more finicky animals on the planet. They want what they want, when they want it. However, I still was not ready for my indoor cat of four years to hate my new house and suddenly go native on me.
Through sheer determination, the crazy cat destroyed my screen door until she got outside, and she's refused to come in since (over five years later!).
Needless to say, I have had to come up with some ways to keep her warm in the winter time. Here is what I found to be one of my better solutions.
Click here to read more
Wednesday, December 1, 2010
Free Pet Safety Pack

click here to get the safety pack
Help keep your pets safe with a free pet safety pack from the ASPCA! In the event of an emergency, our pet rescue window decal alerts rescue personnel that pets are inside your home. The safety pack also includes an ASPCA Animal Poison Control Center magnet—a great way to keep the APCC's toll-free emergency number and website address handy in case your pets get into something they shouldn’t!
Subscribe to:
Posts (Atom)